Hold then Capture a Payment
How do I implement the Hold then Capture feature?
Overview
Hold then Capture mirrors the two-step flow of credit card payments: Authorization and Capture. It lets you place a hold to confirm fund availability, then charge the customer only when you're ready.
Setup & Prerequisites
Account configuration is requiredThis feature is only available for M2 accounts. Whether you are planning to use our test keys or live keys for Hold and Capture integration, you need to activate the Cards feature first by enabling it via the Developers tab (visible only for account owners).
If you are the account owner and you don't see the prompt on your dashboard, feel free to reach out to [email protected]
Once enabled, you can start integrating Hold then Capture on your custom website, app, or Shopify website. You can simultaneously capture payments via API and the Shopify Plugin.
For API Users:
We need to onboard your account (whether you are planning to use our test keys or live keys) before you can start testing and integrating.For Shopify Users
The feature will automatically be available to eligible merchants who have installed the Credit/Debit Card via PayMongo Shopify plug-in.
Definition of Terms
Further context on the terms going to be used in the hold then capture process can be seen below:
| Term | Meaning |
|---|---|
authorization | Confirms that your customer has enough funds available to complete the transaction, giving you confidence before you fulfill the order or service. |
capture | Finalizes the payment and moves it out of the pending state. You decide when to trigger the charge—only once you're ready to complete the transaction and receive the funds. |
straight payment or automatic capture | The automatic capture of the payment after an authorization. |
pre-authorization or manual capture | Temporarily holds a set amount on your customer’s card based on the expected cost. This doesn’t charge them yet, but reserves the funds to reduce the risk of failed payments. |
How does Hold then Capture work?
Think of it like booking a hotel room. When a guest makes a reservation, the hotel places a temporary hold on their card—but the full charge only happens after the stay. This way, the hotel confirms the guest has enough funds upfront, without collecting payment right away. If the reservation is canceled, the hold is released and the guest isn’t charged.
- Upon authorization, we guarantee the money and hold the payment for up to 7 days.
- If the payment is not captured by this time, the authorization is canceled and funds are automatically released by PayMongo. This will be returned to your customer's account within 7 days.
- If the payment is partially captured, the remaining amount will be returned 7 days to 30 days
You can process refunds right after a payment has been captured. You can also cancel the full amount before capturing so that the customer is not charged for the transaction.
Most of our merchants who use this feature are:
- Hotel and Resort merchants that hold the customer's payment upon check-in, but only capture the funds upon check-out
- Food and delivery merchants that hold the customer's payment upon ordering but capture the funds upon stock verification and order pick-up
- Service providers that hold funds for a free trial period before charging the customer's account upon non-cancelation
Integrating Pre-auth and Capture through the Payment Intent Workflow
Traditionally, the authorization and capture are called sequentially. This is what is known as a straight payment or an automatic capture. We currently support this feature as the default way of capturing payments.
With this feature, the merchant can request to capture the funds separately. In this case, the authorization is done prior to when the transfer of funds is actually made. This is what's known as pre-authorization or manual capture.
The payment intent workflow is the main workflow used to make payments via PayMongo. It's in this flow where both automatically captured payments and manually captured payments are made. By default, this workflow is set to the automatic capture of payments. To enable manual captures, a few additional steps just need to be added to the existing workflow.
1. Creating a Manual Capture Payment Intent
To create a payment intent that will be used for manual capture, the merchant can set the capture_type attribute in the payload of the payment intent to manual. When the attribute is not provided, the attribute is automatically set to automatic. Additionally, they can also do straight payments by setting the attribute to automatic.
2. Attaching a Payment Method to a Payment Intent
The attachment follows the same directions as normal in the PIPM workflow. After attachment, the following status flow is observed. For payment intents with the manual capture_type, after either 3DS is completed, or after attachment for non-3DS cards, the status will become awaiting_capture. It's in this status where the authorized payment intent is ready for capture.
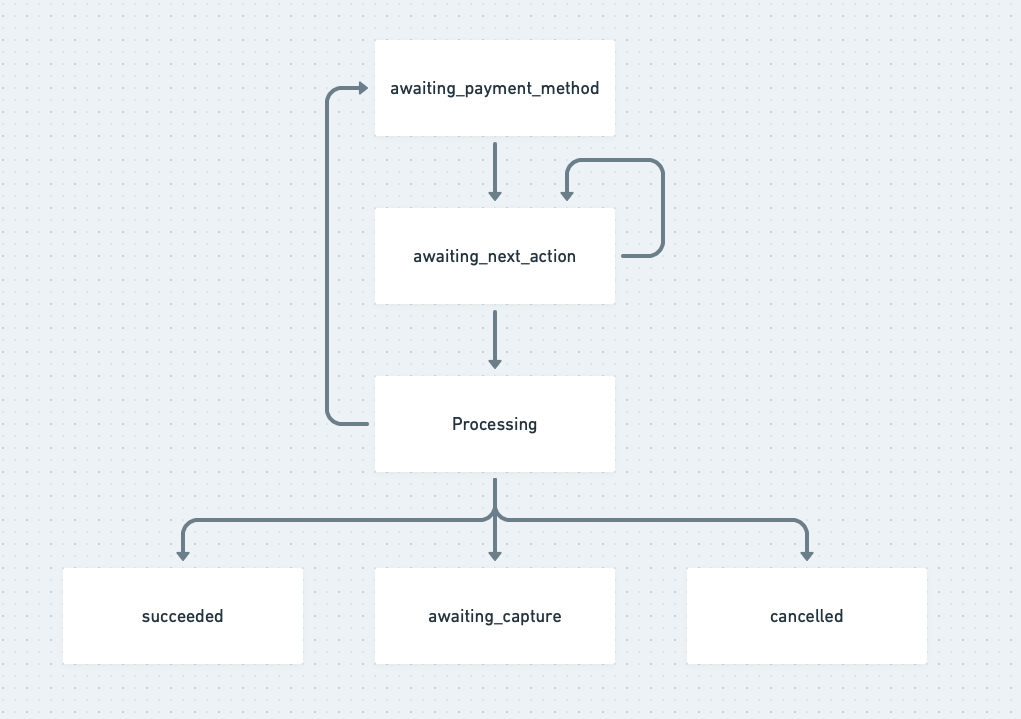
3. Capturing a Payment
The capture API (POST /payment_intents/:id/capture) can be used to capture a payment from an awaiting_capture payment intent. Note that the merchant can only capture within 7 days from when the status was set to awaiting_capture. After 7 days, the authorization is automatically voided.
When capturing, the merchant can optionally set an amount attribute. This pertains to how much they would like to capture from an authorized payment intent. Merchants are allowed three options for this field:
- To not provide the attribute or the payload
- To set the value of the
amountequal to the payment intent amount - To set the value of the
amountas less than the amount of the payment intent
The first and second cases lead to the same result and will fully capture the authorized amount; these are called full captures. The third will only capture a portion of the authorized amount; this is called a partial capture.
On partial captures:The remaining balance of the authorized amount after partial capture is kept on hold by the issuer for around 2-4 weeks depending on the issuer. Unfortunately, it is an industry standard to let the issuer reverse the partial amount after a few weeks. We are still currently investigating a way around this issue.
Sample payload for partial captures:
{
  "data": {
    "attributes": {
      "amount": 10000
    }
  }
}Take note that attaching a payload is an optional step. It is not required to attach the payload if it is intended to be a
full capture.
Cancelling a Payment Intent
Payment intents can be cancelled at any time as long as they aren't in the succeeded or the cancelled status. When they are cancelled while the status is awaiting_capture, we void the authorization. A merchant can void within 7 days before it is automatically voided by our system.
The payment intent status will be cancelled if it is
awaiting_captureand it is automatically cancelled by our system in 7 days. This voiding will reflect instantaneously.
Using Hold then Capture on Shopify
On the Shopify admin dashboard, switch your Shopify settings to "Manual Capture" to automatically put card payments on hold through PayMongo's plugin. This ensures that payments are synchronous between PayMongo and Shopify. Shopify's guide can be found here. You can find a full guide for supporting Hold then Capture payments on Shopify here.
Testing
For test transactions, feel free to check out the testing section of our developer documentation.
Updated 9 months ago